Sunday, February 13, 2011

Valentine Pillows Tutorial

Start off with three different fabrics. I got 1yd of each but didn't use all of it... I could probably make 2 or 3 more. maybe when I get some time...


1. Cut two 17x17 squares from your main fabric.
With one of the squares fold in half and cut out half a heart. (keep the cut out heart for the matching pillow)

2. open it up and determine the size of fabric you'll need to cover the heart... mine was about 10x10. Cut that out of a coordinating fabric.

3. Pin it to the back of the main fabric. (tip: you may want to pin all the way around the heart... I didn't and mine ended up a little crooked.) Then sew around the heart.

4. then you'll do a ruffle from the 3 fabric. I made my strip about 2inches.
and you'll sandwich it between the two 17x17 pieces.
5. Now you can either sew all the way around leaving a 3inch hole and stuff with poly fill, or make a pocket pillow like mine. it makes storing my pillowcases much easier and then I use the same pillow for all my different holiday pillowcases.
to make the pocket case...
6.Take the back piece of fabric and fold one end about 1 inch then fold again. Then sew to create a finished edge.
7. Then cut about a 5x17inch piece of the same fabric and make a finished edge like the step before...
8. Now when layer the front piece with the heart, then ruffle, then the two back pieces, right sides together... Overlaping the two finished edges...

Here is a close up of my edges.... hope that helps. Sew all the way around. and turn inside out and put your pillow in!
2nd Pillow
1. Cut out 17x17 pieces of fabric
2. Make a ruffle with a coordinating fabric and then using the heart cut out from pillow #1, pin the ruffle and the heart to the front of one of the 17x17 pieces.
2. Sew around the edge of the heart.
3. then Sew the front and back piece together. done.
(i did add a 2in piece of fabric folded in half between the two pillow layers for a border, but not necessary)
Good LUCK!
I entered this to Go check it out!

Saturday, February 12, 2011

Cute Slip Tutorial

Please forgive me, I am NEW to the blog world and new to tutorials, but I am so excited about this I'll give it a shot!

I have a few skirts and dresses that are just slightly too short for my style. So when I saw this website http://www.vintagehem.com/ and this etsy shop www.etsy.com/shop/aslipshop Iknew that was the solution to my short problem. The only thing that held me back from buying one of these amazing slips was of course the $$$$... so finally I cleaned off the dust from the old sewing machine and gave it a shot. So for about $10 I got THREE slips! So worth it... Again I am not a good sew-er but it works for me. I'm sure you pros out there know the right stitches and cutting techniques...
Here are the three slips I did.

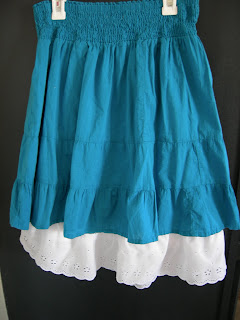
White Eyelet Slip


The slip was at DI for $3.00 and I got 1 1/2 yrd of eyelet trim (depending on your slip you may need more, just measure the bottom, mine was 40) from walmart about $4.00
1. just pinned the trim to the slip.

I pinned about 1 inch above the end of the slip just because for a short girl like me it would have been too long...

Then I just followed the same stitch in the trim...

I did hem the raw edges of the trim also, check the end for tips. that's it!

2. Ruffle Slip
I had this slip, and the material was at walmart in the $2.00 section... I'm not sure what it is, maybe a polyester... it's see through and light. I got 1yd but you might get 1 1/2 if your doing a bigger size.
1. I cut off the lace from this slip... don't worry about the scallop I do a straight line stitch I just wanted to keep the integrity of the finished edge... I don't have a serger or know how to finish an edge of silky material...

2. cut the trim fabric.
1 strip of 10x60 (you may need a longer length depending on your slip, the bottom of my slip measured 40 so i allowed 20inches extra for the ruffle)
1 strip of 8x60
1 strip of 6x60
Then apply fray check if needed. This fabric totally frayed a lot so it needed it bad...

3. do a ruffle stitch on both sides of the strip.
it will look like this...

4. This is by far the hardest part. I started with the 10inch wide strip folded it in half and pinned to the slip. Then add the 8inch strip, then the 6inch strip. I had to pin it quite a few time before it looked right and I had to make sure I had all the layers of the ruffles in the pinned section before I sewed.

5. To ensure I got all the layers I sewed a zigzag stitch and rather than using the foot as a guide i did just a little outside of the foot. if that makes sense. check the picture... maybe it can explain my lack of words...

7. When I got to the end I sewed the two unfinished edges together. for tips check the end of the post.

3 layer edge slip.

The slip i got at DI for $3.00 and the black satin at walmart for $2.00 a yd.
1. So cut 1 strip of 8x41(whatever the end of your slip measures, mine was 40 so 1 inch extra for seam allowance)
1strip of 6x41
1strip of 4x41
Then fold each strip in half and iron, I ironed the 8in first then added the 6in then the 4in, making sure the raw edges meet and the top edges meet. You end up with a 4in, 3in and a 2 inch fabric layer.

2. For this one i wanted the lace of the slip to kind of be the "finished" edge look. so I pinned the lace edge of slip to the layers.

3. Sew along that lace edge. again just make sure you get all the layers of fabric.
Here it is finished.

And here it is on! This one is my FAVORITE! I can't wait to wear it out!
TIPS!!!
I'm sure you will notice while you sew that your pinning was not perfect but you adjust. and of course the finishing edge is the worse.
So I start my sewing about 1-2inches away from the edge or seam, then go around the slip until you are about to meet up at the begining but end about 1-2 inches away as well. At this point you can kind of eyeball where to sew the edges of trim together. So them together. Then go back and finish sewing the rest of trim to the slip.
This slip had a slight curve on the edge i guess for movement and slits in skirts...
So maybe this picture can help you see what i'm trying to explain... man these tutorials are hard.. kudos to all you wonderful tutorial writers!

I linked to

Bubbly Nature

and
Join us Saturdays at tatertotsandjello.com for the weekend wrap up party!

Photobucket

Friday, February 11, 2011

A block for all seasons tutorial

Growing up my mom took a tole painting class and made some blocks similiar to these, except they were all hand painted... So this is bit nostalgic for me. Here is how I made mine.

Supplies:
(4) 4x4x4 blocks... (really measures 3.5x3.5x3.5, but for some reason hardware stores call them 4x4's)...
Paint
Mod Podge
Paper cut into 3x3 squares
Vinyl

1. Paint your blocks. I was making two sets so don't be decieved by 8 blocks in the picture.

2. Mod Podge your paper to your blocks. I did all the "christmas sides" then the "home" sides. allowing it to dry in between.

3. Once all the paper has been mod podged and dried. apply the vinyl.
Here are all six sides of my blocks!
**I did revise my vinyl designs a big. The "o" in love is now a heart, the "u" in luck is now a shamrock, the "a" in fall is now a leaf, and NOEL is now snow with the "o" a snowflake... I'll update the picture soon!

I linked to

Saturday, April 3, 2010

Hobby Lobby inspired Wooden Eggs.

Hello fellow crafters/bloggers/friends. I'm so excited. This is my first guest blog post. So i was completely flattered when Lindsey asked me to post. I've only been sharing my crafts for a little over a month at Norikraft, although i've been crafting for a long time. I like to try everything, I don't have to be a pro, so i am not a perfectionist. As long as it looks good i'm good. I have two boys that keep me busy, so I try to fit crafts in when I have time to keep me sane and help me feel girly in my boy world... I also design and sell vinyl. So if you ever want some help with vinyl, I'll be glad to help!here is what I'm sharing today.
I'm going to share my version of some wood eggs I saw at Hobby Lobby. They were about 20 dollars, they are half off right now but I knew I could make them for less..  I have a lot of stuff on hand, so over all I didn't spend anything, but if I had bought stuff it probably would be about 5 dollars...
ok. so find some wood ovals.  I found the smallest one at the dollar tree and the largest at Joanns on clearance and then I cut the middle one with a jigsaw. I thought it would be scary but it was so easy. If i can do it you can!!
 1. Cut a portion off of your ovals so you have a base.
2. if you cut all yours out just make a template, trace it on the wood, cut them out with a jigsaw...
Here are my three eggs...
3. Paint your eggs. If you haven't seen the hobby lobby ones, they were painted blue, yellow and pink.  I like to do most of my crafts in black. I feel like it blends more with my regular decor and just gives it a good base... 
4. Trace your egg on some paper...   You could totally skip this and just do different colored paint.
5. Mod podge your paper on your eggs.

6. After the mod podge dries, I used e-6000 to glue my eggs together.
7. you could be done at this point, but I added a few felt flowers and ribbon.
All done!
I hope you liked my craft. Come visit me!! THANK YOU!

Wednesday, March 3, 2010

Going Green!

It's March, and time for St. Patricks day! So, my front room has gone green.
I took a branch from my tree, spray painted it gold and hung green, gold and black christmas ornaments...

Here is my St. Patty's Glass Block.

I made these cute wood blocks out of 2x4, scrapbook paper, mod podge and of course vinyl.


12x12 tile and vinyl made this.


And a great idea from Tatertots and Jello lead me to this fun 4-leafed clover. You can read her tutorial here...

To purchase any of this vinyl you can email me!

Sunday, November 1, 2009

Thankful for Crafts


Here is my fall glass block.

A few Fall boards...

And because I'm obcessed with countdowns, a countdown to Thanksgiving. I got the idea from Not so Idle Hands... the tutorial is here...
*if you'd like to purchase any of this vinyl.. let me know!
Related Posts Plugin for WordPress, Blogger...