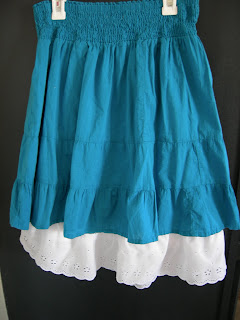
I have a few skirts and dresses that are just slightly too short for my style. So when I saw this website http://www.vintagehem.com/ and this etsy shop www.etsy.com/shop/aslipshop Iknew that was the solution to my short problem. The only thing that held me back from buying one of these amazing slips was of course the $$$$... so finally I cleaned off the dust from the old sewing machine and gave it a shot. So for about $10 I got THREE slips! So worth it... Again I am not a good sew-er but it works for me. I'm sure you pros out there know the right stitches and cutting techniques...
Here are the three slips I did.


White Eyelet Slip
The slip was at DI for $3.00 and I got 1 1/2 yrd of eyelet trim (depending on your slip you may need more, just measure the bottom, mine was 40) from walmart about $4.00
1. just pinned the trim to the slip.

I pinned about 1 inch above the end of the slip just because for a short girl like me it would have been too long...

Then I just followed the same stitch in the trim...

I did hem the raw edges of the trim also, check the end for tips. that's it!

2. Ruffle Slip
I had this slip, and the material was at walmart in the $2.00 section... I'm not sure what it is, maybe a polyester... it's see through and light. I got 1yd but you might get 1 1/2 if your doing a bigger size.
1. I cut off the lace from this slip... don't worry about the scallop I do a straight line stitch I just wanted to keep the integrity of the finished edge... I don't have a serger or know how to finish an edge of silky material...

2. cut the trim fabric.
1 strip of 10x60 (you may need a longer length depending on your slip, the bottom of my slip measured 40 so i allowed 20inches extra for the ruffle)
1 strip of 8x60
1 strip of 6x60
Then apply fray check if needed. This fabric totally frayed a lot so it needed it bad...

3. do a ruffle stitch on both sides of the strip.
it will look like this...

4. This is by far the hardest part. I started with the 10inch wide strip folded it in half and pinned to the slip. Then add the 8inch strip, then the 6inch strip. I had to pin it quite a few time before it looked right and I had to make sure I had all the layers of the ruffles in the pinned section before I sewed.

5. To ensure I got all the layers I sewed a zigzag stitch and rather than using the foot as a guide i did just a little outside of the foot. if that makes sense. check the picture... maybe it can explain my lack of words...

7. When I got to the end I sewed the two unfinished edges together. for tips check the end of the post.

3 layer edge slip.
The slip i got at DI for $3.00 and the black satin at walmart for $2.00 a yd.
1. So cut 1 strip of 8x41(whatever the end of your slip measures, mine was 40 so 1 inch extra for seam allowance)
1strip of 6x41
1strip of 4x41
Then fold each strip in half and iron, I ironed the 8in first then added the 6in then the 4in, making sure the raw edges meet and the top edges meet. You end up with a 4in, 3in and a 2 inch fabric layer.

2. For this one i wanted the lace of the slip to kind of be the "finished" edge look. so I pinned the lace edge of slip to the layers.
Here it is finished.

And here it is on! This one is my FAVORITE! I can't wait to wear it out!
TIPS!!!
I'm sure you will notice while you sew that your pinning was not perfect but you adjust. and of course the finishing edge is the worse.
So I start my sewing about 1-2inches away from the edge or seam, then go around the slip until you are about to meet up at the begining but end about 1-2 inches away as well. At this point you can kind of eyeball where to sew the edges of trim together. So them together. Then go back and finish sewing the rest of trim to the slip.
This slip had a slight curve on the edge i guess for movement and slits in skirts...
This slip had a slight curve on the edge i guess for movement and slits in skirts...
I linked to

and


4 comments:
Adorable! I love it. Might need to do some thrifty slip shopping...
Very Cute! I think I need a few of these as well.
I love this idea! Thanks so much for linking it up! Great job!
Looks very pretty. I liked especially the blue skirt, but all of them are great
Post a Comment